Warren and Peter worked around the rain last week and were able to frame up the exterior walls on the second floor, start the balloon frame for the stairs and finish waterproofing the foundation. Saturday we built temporary stairs to the second floor. You can now walk up the stairs from the basement all the way to the second floor. Fall colors were just starting to turn last week. If you compare the view from last week and this week you see Fall is well on its way.
Archive for September, 2010


I wasn’t expecting a lot to get done last week with all the rain. But Warren had some help and a few sunny days to frame the inside wall in the basement, the temporary stairs up to the first floor and attach the sheathing for the first floor. We didn’t attack the second floor because we expected rain on Sunday. So we worked out details for the interior beveled wall at the windows, the sun shades on the first floor and the stairs. I’m hoping to model them up and post them in the coming weeks. Until then, enjoy the latest pics.


Last week after we put up the first floor exterior walls, Warren finished the interior wall framing, including the double stud wall and the structural wall that separates south-facing living spaces from the north-facing support spaces. He also tacked a few second floor trusses into place.
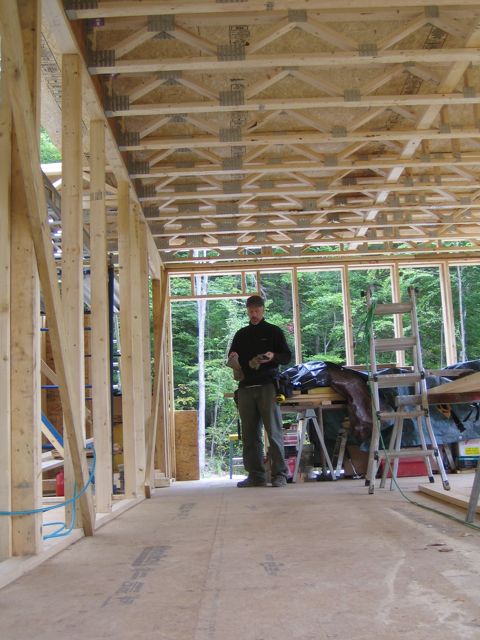
This weekend we finished installing all the second floor trusses and the second floor decking. We even got a chance to put up a few of the external sheathing ZIP panels.
If you’re not familiar with ZIP panels, they are plywood panels with a special external coating (the green layer). This coating acts as our moisture and vapor barrier when the seams between the panels are taped with ZIP tape. Using the ZIP panels means we don’t need house wrap or felt and will make our exterior air sealing much easier.
Final Energy Analysis and Recommendations
Published 13-September-2010 Energy Calculations 2 CommentsBack in May (see June Updates) we met with the energy guys (DEAP Group). At that time they reviewed the plans at that stage and made recommendations to improve the air sealing and insulation levels.
They used the Passive House Planning Package spreadsheet (PHPP) to model our house based on the plans, details, and the type of windows and doors we planned to use.
Their recommendations included:
- Bring the basement into the thermally conditioned envelope. At the time, I was unsure what to do with the basement. Passive-houses and super energy efficient houses don’t typically have basements because they suck heat from the house. But I don’t know how we would have built a house on our site without a basement. So they made the following recommendations.
- Add more insulation under the slab. We added another 4 inches for a total of 6″ of XPF or R30.
- Insulate the foundation walls. We added 2″ of EPS and 9″ of dense pack cellulose to bring our basement walls up to the same R value as the rest of the exterior walls (R42).
- At the time I was considering insulated concrete forms (ICFs), but once we decided to insulate the foundation walls to the same level as the other walls, it didn’t make sense for the extra expense of the ICFs which would not even bring us up to the level of insulation we needed.
- Reposition the radon exhaust pipe to vent outside the foundation wall. It is usually recommended to run the vent pipe up an interior wall to promote upward air drafts for passive ventilation of any possible radon gasses. But this essentially brings outside cold air down an interior wall right through the core of the house. So we positioned the vent pipe outside the foundation wall and stubbed it off. If we detect elevated levels of radon gas in the basement, we can add a vent stack and fan to actively ventilate the gasses.
- Use open-web trusses to facilitate easier installation of ventilation system.
- Exterior overhangs for the first floor south-facing windows to minimize overheating in the summer.
- Simplify double wall system and just use dense cellulose. We had considered a number of options including using 3″ of spray foam and 9″ of cellulose, as well as rigid insulation on the exterior of the sheathing. We decided that the extra effort of sealing the walls as well as our use of an exterior rain screen detail would limit the possibility of moisture condensing inside the wall.
- Remove wood burning appliance (wood stove). They insisted a wood stove would cause more problems than solve in a super tight, super insulated home. (not to mention it is a budget saver) So we opted out of the wood stove for now. Once we live in the house for a while we’ll see what we think. (we can always add one later, but don’t tell the energy guys)
We accepted all their recommendations.
The Final Energy Analysis
I updated the plans and they updated the PHPP model.
They determined that our yearly heating demand would be 12,416 kBTUs and our maximum heating load would be 12.2 kBTU/hr. At these levels a single mini-split air source heat pump (ASHP) on the first floor will supply all the heat that is required. The coldest of days (below 5°F) may require supplemental heat which will be supplied by electric resistance base board or panels, approximately 15 lineal feet throughout the house.
The mini-split ASHP are very very efficient in converting energy to heat. They consist of a small unit in the house, connected to a small unit on the outside of the house. Anyone that has traveled to Europe or eaten in a small New York City restaurant will be familiar with these systems. They are steadily gaining a foothold in the US.
Based on our estimated energy usage, we will require a 6kW (approx.) solar electric (PV) grid-tied system to get to net zero. We would need less if we decided to use a solar hot water system, but these are expensive to install and maintain over time in our climate, too many moving parts. PV is solid state and has proven to be maintenance free for many years.
We also may require a larger solar array depending on the actual amount of solar energy available at our site. We get plenty of sun, but there are tall trees and low hills to our east and west. We plan to live in the house a year or two before adding solar PV to the house. This will allow us to verify our actual energy usage (and budget).
Any questions?
We have chosen our windows. If you remember earlier posts about our criteria for windows (April Update and Window Shopping), you’ll know that we were looking for low U-values (more insulation), high SHGC values (more heat from the sun), and low dollar values (more money in our wallets). We found 2 out of 3.
AccurateDorwin (based in Winnipeg, Canada) is going to make us windows with two different types of glazing. Our south facing casement windows will have a 0.24 U-value and 0.47 SHGC. All other windows will have a 0.20 U-value and a 0.44 SHGC. The fixed window units are the most efficient with a 0.18 U-value. All values are whole window values.
Serious came in second. They make a casement with a 0.17 U-value with 0.33 SHGC (whole window values). Much better U-value but a fairly low SHGC value. And you have to ship them all the way from California and they are not cheap. Plus they use a different technology that can add reflections inside the window, limiting it visibility.
In contrast, the Marvin Integrity All Ultrex windows (our fall-back comparison) are difficult to compare because they only publish center of glass U-values which are always better then the whole window values. Their stated center of glass U-value is 0.25 with a SHGC value of 0.41. Remember, the whole window average is going to be less efficient than center of glass.
We have about 170 sf of glazing area, thats roughly 11% of our conditioned floor area. We added sun shades on the south elevation to block the sun in the mid to late summer.
I’m not sure what the energy guys found, but by my rough calculations, the south facing windows will contribute roughly half of our heating needs in the winter. That includes a bunch of estimates for solar intensity (average sunny days and cloudy days throughout the winter months) and solar heat gain factors (BTU/h-ft2) for our latitude (from the ASHRAE Handbook of Fundamentals).
We’re paying roughly $5k more for windows than if we used our comparison windows, but I’m betting that the extra efficiency will pay for itself. I just don’t want to think about the length of that payback period.
Caution, lots of photos this week.


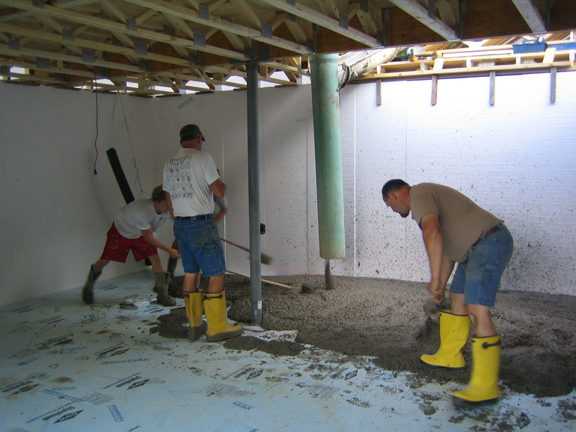


This week we finished installing the interior drainage plane for the foundation walls, insulating the floor under the basement slab and pouring the slab. We also framed out the first floor exterior walls. The weather held out till Saturday afternoon when a cold rain forced us to stop.
We used extruded polystyrene foam (XPS, the blue stuff) under the slab because of its greater compressive strength. We laid two layers of 2 inch foam, then a layer of 6 mil polyethylene as our radon gas barrier. We used acoustical sealant to attach the poly to the drainage plane on the wall to complete our radon gas barrier. Then we laid another 2 inches of XPS foam for a total for R30 under the slab. The top 2 inches of the foam lies on top of the footing. We placed another 2 inches of expanded polystyrene (EPS, the white stuff) on the walls sitting on top of the XPS foam. EPS is more environmentally friendly than XPS. This overlap isolates the concrete slab from the foundation and walls, keeping it dry and warm.
The concrete arrived Friday. They poured and leveled 4 inches of concrete on top of the foam. They also poured a small knee wall in the walkout area and the footings for the deck on the west side of the house.
Above, we raised the first floor exterior walls. You can now start to get a sense of the size of the space and the view out the framed openings. Of course it will feel a bit smaller when we frame up the interior walls, and smaller still when we put up the sheathing and finally the interior drywall. Now you can see the house when driving up the driveway.

