Archive for January, 2011

The cost of infiltration

There are several ways to approximate the cost of a leaky house. Before I proceed, however, I just want to mention there are other much larger longterm monetary benefits to building a tight house, like a longer lifecycle and less maintenance due to keeping critters and moisture out of the building enclosure. I’m sure there’s a way to calculate the value of these additional benefits, but it’s beyond my abilities (and you’d have to use a lot of assumptions to get there).

Having gone through the numbers, there is some value to understanding the factors that are used to estimate the cost of infiltration, as well as the proportion of infiltration cost to the overall energy costs required to heat a house.

The primary method to estimate infiltration is to calculate the energy required to condition the air replaced by infiltrated air. First we must convert the ACH50 value derived from the blower door test to a ‘natural’ value (ACHnat) that might be experienced when the house is not being pressurized by artificial means. Then calculate the energy required to heat the naturally infiltrating air on a yearly basis. Then calculate the cost of the energy used.

Converting ACH50 to ACHnat is based on many assumptions including the climate zone, height of the house and the degree to which the house is shielded from the wind by surrounding vegetation and other structures. Energy Star recommended a value of 17.8 for ‘well shielded’, 14.8 for ‘normal’ and 13.3 for ‘exposed’ locations in Zone 2. Let’s use the normal value for now.

Dividing 1 ACH50 by 14.8 equals 0.067 ACHnat. This means approximately 6-7% of the air volume in the house (992 ft3) will be replaced by infiltration each hour. [This is not entirely accurate since the volume of the basement is included as conditioned space, yet it is not heated directly.] Let’s assume the inside temperature is 65°F and the outside temperature is 10°F. It takes 0.018 BTUs per hour to heat 1 cubic foot of air 1°F. 992 * 0.018 * 55°F = 982 BTU/hr to heat the infiltrated air.

1 BTU equals 0.293 Watts, so 992 * 0.293 = 288 Watts or 0.288 kW. At $0.14/kWh it would cost $0.04/hr while the temperature outside is 10°F. (We’ll take into account that an air source heat pump (ASHP) can be 2 to 3 times more efficient at converting a kW to a BTU later.)

We can use heating degree days (HDD) to estimate the cost over a typical heating season. In our climate area we have 7100 HDD in a heating season. Substituting 7100 for 55 in the above calculations and multiplying times 24 to get a daily value means you would spend roughly $125 for one heating season just to heat infiltrated air.

But as I mentioned earlier, an air-source heat pump can be 2 to 3 times more efficient at converting electricity to heat than simply using electrical resistance. There are other factors that also temper that number. I found the following formula in several blower door manuals (see here, section 6.3.d). The formula introduces two correction factors, one for the efficiency of the heat source and one for everything else.

Annual Heating Cost = (26 x HDD x Fuel Price x CFM50 / N x Seasonal Efficiency) x 0.6

  • 26 is the result of multiplying the heat capacity of air (0.018) x 60 minutes x 24 hours.
  • HDD is the Heating Degree Days (7100).
  • Fuel Price is $/BTU. 1 BTU = 0.000293071 kW. Multiplying times the price of electricity in our area $0.14 kWh gives us 0.0000410299.
  • CFM50 is 245 for 1 ACH50.
  • N is the Energy Climate Factor (14.8).
  • Seasonal Efficiency is the efficiency of the heat source. ASHP range in values from 1-3. Let’s use 2.5. This is one of the correction factors I described earlier.
  • 0.6 is the second correction factor. I found a brief description of what this value represents here.

Using these inputs, we will spend about $30 per heating season just to heat infiltrated air.

If you set Seasonal Efficiency and 0.6 each to 1, then you get roughly the same value I described earlier, $125.

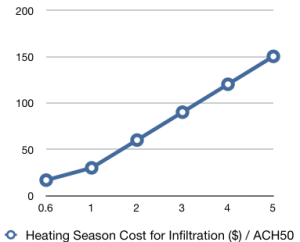
$30 represents the annual cost for air infiltration and it’s less than 6% of the estimated $510 we will spend annually to heat the entire house (space heating only). We can now compare the cost of heating the infiltrated air per heating season for a number of different ACH50 and CFM50 values.

ACH50 / CFM50 0.6 / 137 1 / 245 2 / 469 3 / 704 4 / 939 5 / 1174
Annual cost ($) to heat infiltrated air 17 30 60 90 120 150

In fact, these numbers should be even less because I’ve included the basement volume in these calculations. The basement is not a heated space but it tempers the temperature in the house.

If we can hit a target of roughly 1 ACH50 we will pay 20% of the cost of an EnergyStar house with 5 ACH50.

You can also compare the different values based on Energy Climate Factor.
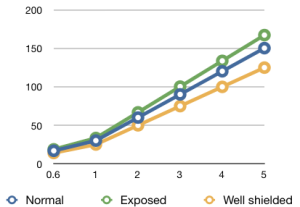
Another way to think about it, our cost is roughly proportional to the amount of air leaked in a blower door test, 6% leakage equals 6% cost of our projected annual heating bill. Saving 6% per year is a lot better than the interest I’m earning on my other investments, and those savings increase as the price of electricity goes up.

Just remember, 6% in this example is based on the expected performance of our house (insulation values, % of window area, orientation, climate, exposure, etc.). A house with lower insulation values, and a warmer climate will find a different % of savings by building a tighter house.

January Update

After a week of on and off snow, the final metal panels of the roof were installed. We officially have a roof.

In preparation for the final electric hookup, the wiring and boxes for the panel and meter were also installed.

How tight is tight enough?

As the snow piles up outside, I have turned my thoughts to Spring. Not only because it’s warmer and nature is waking from it’s long slumber, but also because I hope we will be conducting our first blower door test by then. Specifically I’ve been considering what type of results I should be expecting from the blower door tests, and how to interpret them.

We made the decision early on to build an air tight house. This guided our choice of building materials, Zip system and tape for the exterior sheathing, gaskets and acoustical sealant to seal all other connections, and foam to seal gaps at the rims, windows and doors. The blower door test will help us seal any gaps we missed. But what target should we aim for? How do we know when the house it tight enough?

There are a few standards that define acceptable infiltration levels in a way that can be accurately verified by a blower door test. The PassivHaus standard requires <= 0.6 ACH50. Energy Star 2.0 requires <= 5 ACH50, and Energy Star 2.5 and 3 require <= 4 ACH50. The building code defines prescriptive methods to control infiltration rather than specify testable targets.

So why the big range from 0.6 to 5? And what is ACH50?

The range is due to the different goals of the organizations behind these standards. PassivHaus is a non-governmental organization started in Germany. They set the infiltration standard at the lowest level they thought was easily attainable in residential construction as part of a strategy to reduce overall energy use of the home to very low levels and protect the enclosure from moisture that is transported by the infiltrated air. EnergyStar is a governmental organization that works with the construction industry to set standards. They set targets they think can be achieved by builders over a period of time without upsetting a large population of their constituency. The code is the least common denominator.

ACH50 is Air Changes per Hour at 50 pascals. Basically air is blown into (or out of) the house up to a specific pressure, 50 pascals (very low pressure, 0.00725 PSI), and then see how hard the fan has to work to keep it at the same pressure. From this they can calculate the cubic feet per minute at 50 pascals, or CFM50, of air that is replacing the air that was sucked out at this standard pressure.

To find ACH50 which is in hours, multiply CFM50 * 60 then divide by the House Volume. ‘House volume’ is rarely defined and sounds rather vague and open to creative interpretation. Is it the exterior dimensions and the building height? Or is it the interior dimensions? Do you include the basement?

Because house volume is the divisor, the bigger the value the better your resulting ACH. Which leads me to believe that people often fudge their volume by using the outside dimensions instead of the interior volume which can be quite a difference when your walls are 12 inches thick. PassivHaus even subtracts the interior floor and wall volumes (gotta love German precision).

As for the basement, if the air barrier separates the house from the basement then don’t count it. In our case, the air barrier continues down the foundation wall and under the slab, so I have including the basement volume. This decision has several consequences. Our ACH value will be lower than if we just use the house volume area, and it will cause inaccuracies later when calculating the cost of infiltration since the basement is not heated directly. I think this is why PassivHaus generally recommends building on slabs, not basements.

Let’s look at an example. If our blower door test in the Spring reveals a value of 240 CFM50, then we could end up with the following ACH values depending on how you define ‘house volume’.

240 CFM50 Exterior Interior Interior minus
interior walls
and floors
Dimensions 32’ x 22’ x 23.5’ 30’ x 20’ x 17’ +
28.5’ x 18.5’ x 8.5
trust me
Volume (ft3) 16,544 14,682 13,697
ACH50 0.87 0.98 1.05

Listing the different standards we can see the range of allowable CFM50 values.

Standard Max ACH50 allowable Max CFM50 allowable
PassivHaus* 0.6 137
Uphill House Target** 1-2 245-489
Energy Star 2.5 and 3** 4 979
Energy Star 2.0** 5 1,224

* 13,697 ft3 = Interior volume (including basement), minus interior wall and floor volumes.
** 14,682 ft3 = Interior volume (including basement).

Not only is volume vague, why use volume at all? What does the volume of air in your house have to do with the air tightness of your envelope? Another option is to use surface area of the envelope or building shell instead of volume. See EarthCraft House Guidelines to calculate surface area. EarthCraft recommends a target of <= 0.5.

Marc Rosenbaum also likes specifying air leakage using the surface area because it is not biased towards larger volume homes. He refers to this measurement as CFM50/ssf or shell square footage, and sets a minimum target of <= 0.05 CFM50/ssf for super-insulated homes. (See his presentation on the Efficiency Vermont site.)

Using Rosenbaum’s recommendations the resulting CFM50/ssf are:

4,189 ssf* Super-insulated Conventional
CFM50 200 400
CFM50/ssf 0.05 0.10

* Our shell square footage is 4,189. Slab and ceiling (32 x 22 x 2) + N/S walls (32 x 25.75 x 2) + E/W walls (22 x 25.75 x 2).

Considering the vagaries of ACH, the air leakage ratio (CFM50 / ssf) should be open to less creative interpretation. But there is a similar standard that only counts surface area above ground. See the MLR – Minneapolis Leakage Ratio definition. They also state that a value < 0.5 is good and > 1 is bad, same as EarthCraft, yet they count substantially less surface area, pushing up the allowable air infiltration.

Comparing the PassivHaus and Energy Star standards with Rosenbaum’s recommendations, I’m inclined to shoot for a target range of 200 to 300 CFM50.

So far we have only considered the various standards for air tightness, not the resulting costs of infiltration at various rates nor the additional costs of constructing a tight house.

Next week I’ll post some of the numbers I have been working on to quantify the cost of infiltration. Toward the end of the project I will try to quantify our cost of building a tight house.

Inching closer to power at the site

The rock drilling truck for National Grid showed up on Thursday to drill the remaining 3 holes, 1 for a pole and 2 for wire anchors. (Unfortunately I could not be there to take a picture.) They succeeded despite the 12-18 inches of snow that fell earlier in the week. Warren plowed the drive and spread enough sand for a small beach.

For some reason they were unable to finish filling the anchor hole for one pole and were unable to set the last pole. A crew arrived the next day to set the pole, but were unable to do anything else. So we await yet another visit by the power company to complete the anchors and string the wire, then hopefully install a meter and box.

And lastly, a shot of the house after the snow storm. It’s shedding the snow quite easily on the south facing side, and only about a quarter of the snow still clings to the north side. The last two remaining roof panels are scheduled to arrive early this week, but more snow is on the way…

Poles and roof

National Grid was at the site today to begin installing electric service to the house. This has been a long journey that started back in May.

Yesterday they came out to check the site and decided to try to install the poles with a regular pole auger. We told them there was a lot of rock and ledge, but it was worth a try. If successful it would be cheaper than their original estimate to install service with a rock drill for all poles.

They were able to place 2 out of the 3 poles, and 1 out of 3 cable anchors. They are going to use the rock drill for the remaining pole and 2 cable anchors. There is apparently only one National Grid rock drilling machine in the state. I hope to be the rock drill paparazzi and snap a few pics for the blog.

Roof-wise, they were 6 or 7 panels shy of finishing the north face today. They ran out of fasteners, but a new supply arrived late in the day. We were hoping to finish tomorrow, but they’re calling for 7-9 inches of snow in the next 24 hours so we may not make much more progress this week.

Metal roof progress

They started installing the metal roof yesterday. They were able to complete most of the south facing side. Today they completed the south side (except for the final panel which has yet to be cut), and they completed about a quarter of the north side. Weather willing, they should finish tomorrow.

We’re using a standing seam, snap-on type concealed fastener metal panel system, made by ASP a local sheet metal fabrication company in Scotia. It costs somewhere between a true standing seam (hand folded on site) and a screw down metal roof. The advantage is that the fasteners are concealed so the panels can expand and contract without stressing the fasteners. It’s all prefabricated, so the labor cost is lower.

And now that we can see it in place, we think it looks great.

The south facing side has more fasteners due to the solar panel installation that will be on that side.

We’re still debating snow guards. I have no doubt that snow will accumulate even with a 12/12 pitch and metal roof. When it comes down it will dangerous to anything in it’s way, not to mention our gutters. Had a nice discussion of the merits of a snap on metal roof for solar and snow guards on GreenBuildingAdvisor. Lots of good advice there.


Enter your email address to subscribe to this blog and receive notifications of new posts by email.

Join 305 other subscribers